Create Classic Load Balancer
On This Page
Practice
Planning the Classic Load Balancer
When you connected to the AWS account provided in the former step, you had a few things that were already deployed. This is the current infrastructure that was already deployed for you:
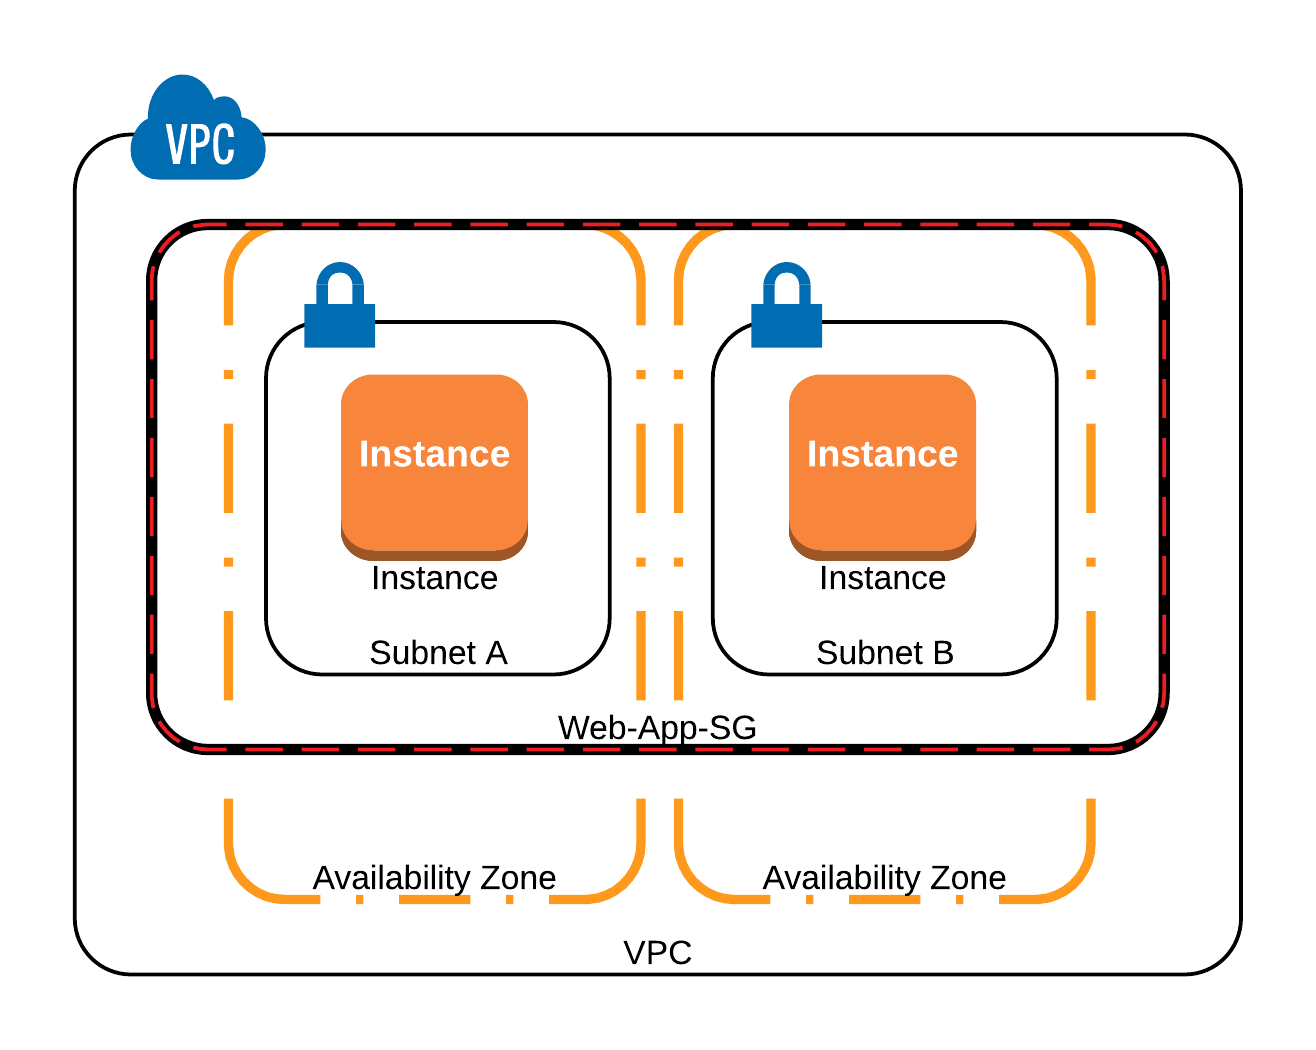
You already have a VPC with some subnets and 2 EC2 instances running inside the VPC in different Availability Zones. Both instances are inside the same Security Group called , which is allowing HTTP access from port 80 to anywhere (0.0.0.0/0). Each EC2 instance is running the same web application. We want to configure an LB to create a central point of access to our application, and we also want to configure our architecture in a way that users can only access the application through the ELB.
In the end, we should have a solution similar to this one:

To do that we will have to create and configure a Classic Load Balancer, and properly configure the needed Security Groups to make sure that our application will work as expected.
Creating a Classic Load Balancer and Registering EC2 Instances
A Classic Load Balancer allows traffic to be balanced across many Amazon EC2 instances, it performs this balancing at the request and connection level.
1. In the AWS Management Console search bar, enter EC2, and click the EC2 result under Services:

2. In the left-hand menu, under Load Balancing, click Load Balancers:

3. To start creating your classic load balancer, click Create Load Balancer:

Three tiles will be displayed detailing the different types of load balancer supported by Amazon EC2.
4. At the bottom of the page, click Classic Load Balancer:

5. In the Classic Load Balancer tile, click Create:

A multi-step wizard will open allowing you to configure and customize your load balancer.
6. Under Basic Configuration, enter the following values:
- Load Balancer name: Enter classic-elb
- Enable advanced VPC configuration: checked

Be aware there are limitations on the name field, only the characters a-z, A-Z, 0-9 and hyphens are allowed.
Create LB Inside lets you select which VPC you want the load balancer to be created in, leave this at the default.
The Create an internal load balancer option determines whether the load balancer can accept public internet traffic or not. If checked, the load balancer will have a private IP address and will only be able to accept traffic from another source inside the VPC.
The default Listener Configuration, listening on port eighty (HTTP), is all that is required for this lab.
7. Under Select Subnets, click the plus icon next to each subnet.
As you click for each subnet, it will move from the Available subnets table, to the Selected subnets table:

An Availability Zone, often referred to as an AZ, helps make your infrastructure more reliable. You can think of each zone as a separate data center (in many cases they are exactly that), they are guaranteed to have redundant power, networking, and connectivity within an AWS region.
To learn more about regions, availability zones, and redundancy in AWS, visit the documentation here.
Each subnet is mapped to one availability zone. It’s important to configure the selected subnets correctly. If a subnet containing an EC2 instance is not selected, the load balancer will not be able to communicate with that EC2 instance.
8. To move to the next step of the wizard, click Next: Assign Security Groups:

9. In the form, enter and select the following values:
- Assign a security group: Select Create a new security group
- Security group name: Enter elb-sg
- Description: Enter Security group for the classic load balancer

You will see a default security group rule allowing traffic on port eighty.
10. In the default security group rule, in the Source drop-down, select Anywhere:

11. To advance to the next page of the wizard, click Next: Configure Security Settings:

This wizard step display’s a warning that your load balancer isn’t configured to use HTTPS or SSL.
It’s strongly recommended that you always enable encrypted traffic on your load balancers for security reasons. Configuring SSL is beyond the scope of this lab. If you would like to learn more about SSL and load balancing, it’s covered in the Using Elastic Load Balancing & EC2 Auto Scaling to Support AWS Workloads course.
12. To move to the next wizard step, click Next: Configure Health Check:

13. In the Ping Path field, replace the contents with /:

By default, the fields on this page specify that the health check will be performed using the HTTP protocol on port eighty. This means the load balancer will assume an instance is healthy when the instance returns a 200 OK response.
The Advanced Details allow you to further customize different aspects of the health check:
- Response Timeout: How long to the load balancer should wait for a response from the EC2 instance.
- Interval: Amount of time between health checks.
- Unhealthy threshold: The number of consecutive failed healthy checks that must occur before the load balancer declares the EC2 instance unhealthy.
- Healthy threshold: The number of consecutive health checks that must occur before declaring an EC2 instance healthy.
To learn more about Elastic Load Balancing health checks, see the AWS documentation here.
14. To move to the next wizard step, click Next: Add EC2 Instances:

This step of the wizard displays the EC2 instances that currently exist and can be added to the load balancer:

15. Select the instances named web-node:

Take a look at the configuration options on this page:
Cross-Zone Load Balancing ensures that your LB distributes incoming requests evenly across all instances in its enabled Availability Zones. This means that the LB will ignore the default of round-robin and will also take into consideration the Availability Zone in which the instance is running. This reduces the need to maintain equivalent numbers of instances in each enabled Availability Zone and improves your application’s ability to handle the loss of one or more instances.
Connection Draining is used to ensure that a Classic Load Balancer stops sending requests to instances that are de-registering or unhealthy while keeping the existing connections open.
Leave these options at their defaults.
16. To advance to the next wizard step, click Next: Add Tags:

In a non-lab environment, it is best practice to add tags to resources you create. Tags help make managing, organizing, and filtering resources in AWS easier.
To read more about tagging resources in AWS, see this document from AWS.
17. To proceed to the review step, click Review and Create:

This page allows you to review the load balancing settings you have configured:

18. To create your load balancer, click Create:

You will see a notification that your load balancer has been successfully created:

19. To return to the EC2 management console, click Close:

Configuring Security Groups for Load Balanced EC2 Instances
1. In the list of load balancers, ensure your load balancer is selected:

You will see some tabs beneath the list and the Description tab will be selected.
This tab shows general information about your load balancer.
2. To view information about instances registered with this load balancer, click the Instances tab:

You will see the instances and availability zones listed:

The instances will have a status of InService. This means the load balancer is performing successful health checks on the instances.
Note: If you see the Status as OutOfService then the instances are still be registered. Wait a minute or two and then click the refresh icon in the top-right corner.
3. To see the DNS of your load balancer, click the Description tab.
4. Copy the domain name from the value of the DNS name field:

Warning: Don’t include the (A Record) part of the value when copying.
5. In a new browser tab, paste the domain name, and press enter.
You will see an instance Id displayed:

Note: Your instance Id will be different.
An application has been pre-installed on the EC2 instances that will respond to web requests with the instance Id of the instance serving the request.
To see the Id of the other EC2 instance, refresh the page. If the Id doesn’t change, you may need to open an incognito or private browsing tab and visit the DNS name again.
Seeing the Id change shows that the load balancer is working as expected, routing traffic to both registered instances.
Leave this tab open and remember this is the tab for the load balancer, you will use it again later in the lab step.
6. In the left-hand menu, under Instances, click Instances:

You will see two instances named web-node with a status of Running:

7. Select one of the instances:

You will see tabs displayed below the list of instances.
8. In the Details tab, in the Public IPv4 DNS field, click the copy icon:

The public DNS name of the EC2 has been copied to your clipboard.
9. In a new browser tab, paste the DNS name and press enter.
You will see an instance Id displayed again.
However, this time, because you are accessing the instance directly if you refresh or visit the DNS name in an incognito or private browsing tab, the Id won’t change.
Note that you are accessing the instance directly, this is allowed by the security group associated with the EC2 instances. Allowing load-balanced instances to be publicly accessible is a bad security practice, and there is rarely a good reason for it.
In the rest of this lab step, you will modify the EC2 instance’s security group to only allow traffic from the load balancer.
Leave this browser tab open and remember this is the tab for an EC2 instance, you will use this tab again later.
11. Ensure the classic-elb load balancer is selected.
12. In the Description tab, scroll down to the Security section:

This is the security group you configured when you created the load balancer.
13. In the left-hand menu, under Network & Security, click Security Groups:

You will see a list of security groups:

14. Select the SG which has the Group Name starting with cloudacademylabs- .
This is the security group of the EC2 instances.
You will see tabs displayed beneath the list.
15. In the row of tabs, click Inbound rules:

16. To modify the rules of this security group, click Edit inbound rules:

You want to allow only connections coming from the load balancer to the instances, however, the balancer doesn’t have a particular IP address associated with it so you can’t specify an IP address here. Instead, you will restrict the access by using the security group you created for the balancer.
You will change the current rule to deny access to anywhere and allow it only to members of the load balancer’s security group.
17. Delete the existing rule, and create a new one whose Type is HTTP. In the Source drop-down, ensure Custom is selected and in the box next to it, select elb-sg:

18. To save your changes, in the bottom-right, click Save rules:

With your rule saved, reload the browser tab with the DNS of the load balancer.
This will continue to work, you will see an instance Id displayed.
19. Reload the browser tab with the DNS of an instance in the address bar:
The exact behavior will vary depending upon your web browser.
Most likely you see the loading symbol in the browser tab spinning indefinitely:

If you wait long enough, your browser will report that it timed out trying to reach the instance:

Checking Your Load Balancer’s Behavior During Instance Failures
You will see two instances named web-node listed.
2. To stop an instance, right-click one of them.
3. In the menu that appears, click Instance state, and then click Stop instance:

You will see a dialog box asking you to confirm that you want to stop the instance.
4. To confirm, click Stop:

The instance’s Instance state column will change to Stopping. A few moments later you will see it changed to Stopped:

Stopping the instance will make it fail your load balancer’s health checks.
6. Ensure the classic-elb load balancer is selected.
7. In the row of tabs below the load balancer list, click Instances:

Look at the Status column in the instances table, one of the instances will still be InService, and the other will be OutOfService:

This means that there is only one instance serving the application, and therefore all the requests will be forwarded to the same instance.
You can test this behavior by clicking on the Description tab and accessing the DNS nameof the load balancer in a new browser tab. Your request will be served by the instance that you didn’t stop.
Leave the browser tab with the load balancer’s DNS name open. You will test it again after starting the stopped instance.
8. To start the stopped instance, in the left-hand menu, under Instances, click Instances:

9. Right-click the stopped instance.
10. Click Instance state, and click Start instance:

Note: You can also access this menu using the Actions button in the top-right.
The Instance state column will change to Pending, and a few moments later, to Running.
Test accessing the load balancer by it’s DNS name again. This time, you will see that both instances are serving requests.
Note: You may need to open the load balancer’s domain name in an incognito or private browsing tab to see both instance Ids.
Monitoring your Classic Load Balancer
2. In the list of load balancers, ensure the classic-elb load balancer is selected, and click the Monitoring tab:

You will see a number of graphs of different CloudWatch metrics.
The Elastic Load Balancing (ELB) service reports metrics to CloudWatch only when requests are flowing through the load balancer. If there are requests flowing through the load balancer, the load balancing service measures and sends its metrics in sixty-second intervals. If there are no requests flowing through the load balancer, or no data for a metric, the metric is not reported.
There are a few metrics related to a Classic Load Balancer, and most are self-explanatory if you are familiar with HTTP requests. If some of them are unfamiliar to you, visit the Amazon AWS documentation to read more.
The metrics called HealthyHostCount, and UnHealthyHostCountwill count the number of Healthy and Unhealthy instances respectively. These metrics can be useful for you to identify a major problem in your AWS account. A healthy instance is one that is passing the health checks performed by the load balancer.
You could use CloudWatch Alarms to notify you when you have less than 2 instances running your application, though to be clear this is not a general rule: the number of instances that might identify a problem will vary depending on your environment.
Also notice that in these metrics, there is no way of seeing the Availability Zone to which the Healthy/Unhealthy instance belongs. In our lab, we stopped an instance for a few minutes, therefore you should be able to see something like this:
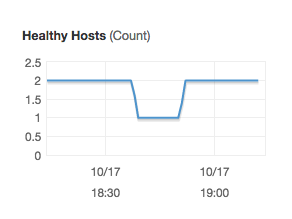
If the Healthy Hosts metric reaches zero, that means that people won’t see anything when accessing your load balancer, and it is probable that you have a big problem in your infrastructure.
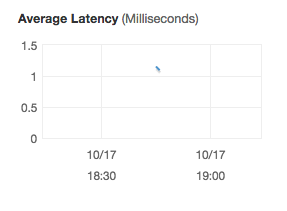
The Average Latency metric might be useful to identify potential issues in your setup. Maybe everything is working in your application, but you notice an increase in this metric. If you haven’t changed anything in your application, that can be a potential issue - maybe you haven’t provisioned enough EC2 instances, or you even have lots of instances but they don’t have enough power to serve your increasing traffic.
The other metrics can be very useful for troubleshooting specific scenarios and will vary depending on your setup.